Pythonで、小数を分数で近似する方法いろいろ

例えば3.14を分数で近似するには、分子と分母をどう選べばよいでしょうか。調べてみるとなかなか奥が深い問題です。

方法1. floatのas_integer_ratio()

以下のように、as_integer_ratio()を用いることができます。

>>> (0.25).as_integer_ratio()
(1, 4)

これは1/4が0.25を近似する分数であることを意味しています。PythonでもRubyのように数値がメソッドを持つことがあるというのはちょっとした驚きです。

ただ、この方法で0.1を分数で近似しようとすると、以下のようにとてつもなく大きな分子・分母のペアが返ってしまいます。

>>> (0.1).as_integer_ratio()
(3602879701896397, 36028797018963968)

ここで、as_integer_ratio()の仕様を調べてみると、as_integer_ratio()は無条件にもっともよい近似を探しているわけではなく、分母が2のN乗という条件のもとで近似を探していることが原因のようです(参考:python - Implementation limitations of float.as_integer_ratio() - Stack Overflow)。 実際、36028797018963968 は2の55乗です。しかし、0.1を近似するのにこの結果だと少々大仰すぎる感じがします。

方法2. Fraction

fractionモジュールを使っても分子・分母のペアを得られます。

>>> from fractions import Fraction
>>> Fraction(0.1)
Fraction(3602879701896397, 36028797018963968)

方法2は方法1と比べて、分母の最大値を引数でコントロールできる利点があります。例えば、円周率を1000以下の整数の割り算で近似したければ、以下のようにできます。

>>> import math
>>> Fraction(math.pi).limit_denominator(1000)
Fraction(355, 113)

355/113 = 3.1415929203539825... なので、なかなかよく近似できています。ただ、これがこの条件下で最良の結果なのかは不明です。また、 この方法でも分母を2のN乗に限定したい場合がありそうですが、その方法は不明です。

方法3. Decimal

Pythonの標準モジュールであるdecimalを使うと、10進数で表された小数、例えば0.13.14を正確に表すことができます。小学校の小数点に関するドリルを正確に解くための道具だと思えばよいと思います。

decimalを使うと、以下のように正確に分数を求められました。とはいっても、自明な分数を求めたあとに分子と分母を最大公約数で割っているだけなので、あまり面白みはありません。

>>> from decimal import Decimal
>>> Decimal('3.14').as_integer_ratio()
(157, 50)

方法3はPython 3.6以降限定です。

使い道

組み込み用途で役立ちそうです。浮動小数の定数を事前に分数で近似しておくことで、コストが高い浮動小数演算の代わりに整数演算が使えます。

おまけ

python - Implementation limitations of float.as_integer_ratio() - Stack Overflow を見ていて知った情報ですが、 江戸時代の有馬 頼徸は、円周率を29桁まで近似する分数を1766年に求めていたそうです(Arima Yoriyuki - Wikipedia) 。ページから計算結果を以下に引用します。手計算でPython版より高い精度で近似できているのは驚きです。

print "python: ",Decimal(884279719003555) / Decimal(281474976710656)
print "Arima:  ",Decimal(428224593349304) / Decimal(136308121570117)
print "Wiki:    3.14159265358979323846264338327950288"

# 実行結果
python:  3.14159265358979311599796346854418516
Arima:   3.14159265358979323846264338327569743
Wiki:    3.14159265358979323846264338327950288

参考文献

Pythonの並列処理・並行処理のための標準モジュールの比較

Pythonで並列処理・並行処理を提供する標準モジュールは数多くあり、初めてだと違いを理解するのは困難です。この記事では、それぞれの違いについて調べました。

threadモジュール(Python 2), _threadモジュール(Python 3)

かつてPython 2にはthreadモジュールという複数のスレッドを扱うためのモジュールが存在していましたが、Python 3でdeprecated扱いになりました。一応_threadモジュールという名前で残っています。公式でも述べられているように、一般には、thread/_threadモジュールではなく、より高レベルなthreadingモジュールの使用が推奨されるようです。

threadingモジュール

threadingモジュールは、先述の通り、複数のスレッドを扱うためのモジュールです。thread/_threadモジュールより高レベルとはいうものの、この後に紹介するモジュールに比べるとまだまだ低レベルで、C++11のthreadライブラリと同程度の印象を受けます。

コード例を以下に示します。threading.Threadクラスを継承したクラスを作るのが常套手段のようです。

#!/usr/bin/python3

import threading
import time

class MyThread(threading.Thread):
   def __init__(self, name, sleep_time):
      threading.Thread.__init__(self)
      self.name = name
      self.sleep_time = sleep_time
   def run(self):
      print ("Starting " + self.name)
      time.sleep(self.sleep_time)
      print ("Exiting " + self.name)

thread_num = 3
threads = []
for i in range(thread_num):
    threads.append(MyThread("Thread-{}".format(i), 5 - i))

for th in threads:
    th.start()

for th in threads:
    th.join()

print("end")

この例では、3つのスレッドをstart()でほぼ同時に立ち上げます。3つのスレッドは、それぞれ5秒、4秒、3秒待機したのちに終了します。すべてのスレッドが終了するのをjoin()で待ってからプログラムを終了します。このプログラムを実行するとちょうど約5秒で終わることが確かめられます。

ここで、Pythonでのマルチスレッド処理は、C++とのマルチスレッド処理とは大きく異なることを知っておくのは重要です。Pythonの主要な実装系の一つであるCPythonにはGIL(Global Interpreter Lock)という機構があり、複数のスレッドが同時にPythonバイトコードを実行することを許しません(参考:GlobalInterpreterLock - Python Wiki)。なので、例えばCPU速度がボトルネックになるような重い計算処理(いわゆるCPU boundな処理)を、このthreadingを使って複数のスレッドに割り振って動かしたとしても、実際にはGILの制約のために複数のスレッドが同時に実行されることはなく、処理時間は期待したように短くならないはずです。

一方、ディスクの読み出し・書き込みなどのI/O待ち時間が大量に発生するような処理(いわゆるI/O boundな処理)であれば、GILは問題にならないので、このthreadingを使ってマルチスレッド化することで処理時間が早くなる可能性があります。

threadingモジュールは後述する他のモジュールに比べて自由度が高い分、デッドロックやデータ競合が起こらないように十分考慮してプログラムを組む必要があります。以下は、リソースをロックする順番をめぐってデッドロックしてしまう例です。

# cf. http://dabeaz.blogspot.jp/2009/11/python-thread-deadlock-avoidance_20.html

import threading

a_lock = threading.Lock()
b_lock = threading.Lock()

def foo():
    with a_lock:
         with b_lock:
            print ("a -> b")

def bar():
    with b_lock:
         with a_lock:
            print ("b -> a")

class MyThread(threading.Thread):
   def __init__(self, func):
      threading.Thread.__init__(self)
      self.func = func
   def run(self):
      while True:
         self.func()

th1 = MyThread(foo)
th2 = MyThread(bar)

th1.start()
th2.start()

th1.join()
th2.join()

multiprocessingモジュール

multiprocessingモジュールは、複数のプロセスを扱うためのモジュールです。スレッドの代わりにサブプロセスを立ち上げてそちらで処理させることで、GILの問題を回避することができます。ただし、サブプロセスの立ち上げは、スレッドの立ち上げに比べると重い処理なので、本当にプロセス単位での並列化が必要なのか、言い換えると、スレッド単位の並列化で十分ということはないか、一考が必要です。

multiprocessing.Process

multiprocessing.Processを使った例を以下に示します。先に示した、threading.Threadクラスを用いた例と使い方は同じです。こちらもプログラマが使い方を誤るとデッドロックやデータ競合を引き起こすので、要注意です。

#!/usr/bin/python3

import multiprocessing
import time

class MyProcess(multiprocessing.Process):
   def __init__(self, name, sleep_time):
      multiprocessing.Process.__init__(self)
      self.name = name
      self.sleep_time = sleep_time
   def run(self):
      print ("Starting " + self.name)
      time.sleep(self.sleep_time)
      print ("Exiting " + self.name)

process_num = 3
processs = []
for i in range(process_num):
    processs.append(MyProcess("Process-{}".format(i), 5 - i))

for th in processs:
    th.start()

for th in processs:
    th.join()

print("end")

multiprocessing.Pool

さらに、multiprocessingモジュールは、「データを複数プロセスにばらまいて、複数プロセスで計算させ、結果を集める」(fork-join)という、並列処理でよくあるユースケースを実現する専用のAPIを追加で提供しています。それがmultiprocessing.Poolです。

例えば、「実数からなるあるリストが与えられたとき、リストの各要素を2乗したリストを出力」する処理を、multiprocessing.Poolを用いて4プロセス並列で実行する例を以下に示します。

import multiprocessing

def pow2(n):
   return n * n

before = list(range(100000000))
with multiprocessing.Pool(4) as p:
   after = p.map(pow2, before)

print(before[:5]) # [0, 1, 2, 3, 4]
print(after[:5]) # [0, 1, 4, 9, 16]

このプログラムを実行中にpsコマンドなどでプロセスを見ると、メインプロセスに加えてサブプロセスが4つ立ち上がっているのを観察できると思います。

より複雑な機能に関しては公式ドキュメントをご覧ください。

multiprocessing.dummy.Pool

multiprocessingには、あまり知られていないmultiprocessing.dummy.Poolモジュールが存在しています。前の節で紹介したmultiprocessing.Poolはプロセス単位で処理を並列化したのに対し、このmultiprocessing.dummy.Poolはスレッド単位で処理を並列化します。ともにAPIは同じです。

前節のコードを、スレッド単位で並列化するように変更した例を以下に示します。

import multiprocessing.dummy

def pow2(n):
   return n * n

before = list(range(100000000))
with multiprocessing.dummy.Pool(4) as p:   # この行が変わっただけです
   after = p.map(pow2, before)

print(before[:5])
print(after[:5])

プロセス単位での並列化と、スレッド単位での並列化を、1行の書き換えのみで簡単に切り替えられるので、並列化の対象となる処理がCPU boundかI/O boundかを実際に確かめたいときに使えるテクニックだと思います。参考:multithreading - How to use threading in Python? - Stack Overflow

concurrent.futuresモジュール

Python3.2からconcurrent.futuresモジュールが提供されるようになりました。Python 2.x系でもPyPIから同名のパッケージを取得可能です。

これまで見てきたようなマルチスレッドやマルチプロセスの処理を隠蔽して、複数の処理を同時に行うための抽象度の高い機能を提供します。具体的には、Futureと呼ばれるクラスを提供することで、「非同期処理が完了した状態、または、未完了の状態」を表すことができるようになります。このモジュールの導入の経緯については、PEP 3148 -- futures - execute computations asynchronously | Python.org に詳しいです。

concurrent.futuresが提供するメインの機能は、futures.ThreadPoolExecutorfutures.ProcessPoolExecutorです。それぞれ、マルチスレッド処理、マルチプロセス処理を扱いたい時に用います。まず、futures.ProcessPoolExecutorを使って、1000個のタスクをプロセス並列で同時に実行する例を以下に示します。(最初はmultiprocessing.Pool()の例と同じくサイズ1億で試したのですが、メモリ使用量が際限なく増えてしまいました)

from concurrent import futures

def pow2(n):
   return n * n

before = list(range(1000))
with futures.ProcessPoolExecutor(max_workers=4) as executor:
   after = executor.map(pow2, before)

print(before[:5])
print(after[:5])

これは今まで見てきたmultiprocessing.Pool()とかなり似た書き方です。

上の例ではFutureという概念は隠蔽されていてますが、陽に扱うこともできます。以下に、map()を使わずFutureオブジェクトを用いて並列処理する例を示します。

#!/usr/bin/python3

from concurrent import futures

def pow2(n):
   return n * n

before = list(range(1000))
with futures.ThreadPoolExecutor(max_workers=4) as executor:

   print("submission starts")
   to_do = []
   for num in before:
      future = executor.submit(pow2, num)
      to_do.append(future)
   print("submission ends")

   after = []
   for future in futures.as_completed(to_do):
      res = future.result()
      after.append(res)

print(before[:5])
print(after[:5])

実行例は以下です。処理順は不定です。

submission starts
submission ends
[0, 1, 2, 3, 4]
[262144, 244036, 122500, 163216, 280900]

concurrent.futuresモジュール

concurrent.futuresモジュールはPython 3.4から導入された、イベントループに基づく非同期処理を行うためのモジュールです。

このモジュールは公式ドキュメントの量が半端ではなく、自分もあまり理解できていないため、紹介のみにとどめます。

まとめ

以下の方針でモジュールを選ぶのがよいと思います。

  • 処理はI/O boundである
    • 処理はfork-joinモデルで並列化できる
      • multiprocessing.dummy.Pool を使う
      • → または、 futures.ThreadPoolExecutormap関数を使う
    • 処理はもっと複雑
      • futures.ThreadPoolExecutorsubmit関数を使って、タスク単位に処理を行う
      • → または、threading を使って、さらに柔軟にモデルを組み立てる
  • 処理はCPU boundである
    • 処理はfork-joinモデルで並列化できる
      • multiprocessing.Pool を使う
      • → または、 futures.ProcessPoolExecutormap関数を使う
    • 処理はもっと複雑
      • futures.ProcessPoolExecutorsubmit関数を使って、タスク単位に処理を行う
      • → または、multiprocessing を使って、さらに柔軟にモデルを組み立てる

参考URL
Makefileの書き方に関する備忘録 その4

他にもMakefileに関する記事を書いていますが、この記事だけで読んでも問題ありません。目次→Makefileの書き方に関する備忘録 - minus9d's diary

少し複雑な構成を持つC++のコード群からバイナリをビルドするための良いMakefileの例を makefile - How to place object files in separate subdirectory - Stack Overflow に見つけたので共有します。

目標

まず、以下のようなソースコードを持っているとします。srcC++ソースコードを格納するディレクトリで、その下のディレクトリ構造は決まった形をもたないものとします。includeはヘッダファイルのみを格納するディレクトリです。

/your_project
  /src
     /subdir1/a.cpp, a.h
              b.cpp, b.h
     /subdir2/subsubdir/c.cpp, c.h
     d.cpp, d.h
  /include
     e.h

これをビルドして以下のようにするのを目標とします。

/your_project
  /src
  /include
  /obj  中間生成物置き場
  /bin  最終バイナリ置き場 

Makefile

前出のページを参考に、自分なりに取捨選択して書き直したMakefileが以下です。このファイルは、your_projectディレクトリの直下に置かれているものとします。

# 参考:https://stackoverflow.com/questions/5178125/how-to-place-object-files-in-separate-subdirectory

# C++のコンパイラ
CXX          := g++

# 生成するバイナリの名前
TARGET      := target

# ディレクトリ名
SRCDIR      := src
BUILDDIR    := obj
TARGETDIR   := bin

# 拡張子名
SRCEXT      := cpp
DEPEXT      := d
OBJEXT      := o

# コンパイル、リンクのフラグ
CXXFLAGS    := -Wall -g -std=c++14
LDFLAGS     :=
INC         := -Isrc -Iinclude

#---------------------------------------------------------------------------------
# DO NOT EDIT BELOW THIS LINE
#---------------------------------------------------------------------------------

sources     := $(shell find $(SRCDIR) -type f -name *.$(SRCEXT))
objects     := $(patsubst $(SRCDIR)/%,$(BUILDDIR)/%,$(subst $(SRCEXT),$(OBJEXT),$(sources)))
dependencies := $(subst .$(OBJEXT),.$(DEPEXT),$(objects))

# Defauilt Make
all: directories $(TARGETDIR)/$(TARGET)

# Remake
remake: cleaner all

# ディレクトリ生成
directories:
    @mkdir -p $(TARGETDIR)
    @mkdir -p $(BUILDDIR)

# 中間生成物のためのディレクトリを削除
clean:
    @$(RM) -rf $(BUILDDIR)

# 中間生成物のためのディレクトリと最終生成物のためのディレクトリを削除
cleaner: clean
    @$(RM) -rf $(TARGETDIR)

# 自動抽出した.dファイルを読み込む
-include $(dependencies)

# オブジェクトファイルをリンクしてバイナリを生成
$(TARGETDIR)/$(TARGET): $(objects)
    $(CXX) -o $(TARGETDIR)/$(TARGET) $^ $(LDFLAGS)

# ソースファイルのコンパイルしてオブジェクトファイルを生成
# また、ソースファイルの依存関係を自動抽出して.dファイルに保存
$(BUILDDIR)/%.$(OBJEXT): $(SRCDIR)/%.$(SRCEXT)
    @mkdir -p $(dir $@)
    $(CXX) $(CXXFLAGS) $(INC) -c -o $@ $<
    @$(CXX) $(CXXFLAGS) $(INC) -MM $(SRCDIR)/$*.$(SRCEXT) > $(BUILDDIR)/$*.$(DEPEXT)
    @cp -f $(BUILDDIR)/$*.$(DEPEXT) $(BUILDDIR)/$*.$(DEPEXT).tmp
    @sed -e 's|.*:|$(BUILDDIR)/$*.$(OBJEXT):|' < $(BUILDDIR)/$*.$(DEPEXT).tmp > $(BUILDDIR)/$*.$(DEPEXT)
    @sed -e 's/.*://' -e 's/\\$$//' < $(BUILDDIR)/$*.$(DEPEXT).tmp | fmt -1 | sed -e 's/^ *//' -e 's/$$/:/' >> $(BUILDDIR)/$*.$(DEPEXT)
    @rm -f $(BUILDDIR)/$*.$(DEPEXT).tmp

# Non-File Targets
.PHONY: all remake clean cleaner

このMakefileでは、"DO NOT EDIT BELOW THIS LINE" より上にある項目を自分の環境に合わせて変更し、makeとコマンドを打つことで、バイナリがbin以下にできるようになります。

また、ソースコードの依存関係も自動で抽出するので、あるファイルを更新したあとmakeすると、そのファイルに依存するすべてのファイルに再コンパイルがかかります。

使い方は以下の通りです。

Pillowで読み込んだ画像に対してChainerCVの検出器を実行

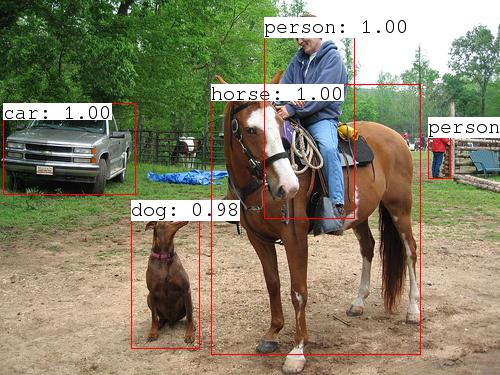
今年の8月、PFNからGitHub - chainer/chainercv: ChainerCV: a Library for Computer Vision in Deep Learningがリリースされました。今のところ2つの物体検出手法(Faster R-CNN, SSD)と1つの画像セグメンテーション手法(SemSeg)が実装されています。examplesフォルダにあるサンプルファイルを実行するだけでお手軽に物体検出を試せるようになっていて、敷居が下がっています。

しかしながら、公式サンプルでは、入力画像を読み込むのに`chainercv.utils.read_image()を使う方法しか示されていないようです。そこで、この記事では、Pillowで読み込んだ画像に対してFaster R-CNNを実行し、自前で検出結果を画像に重畳するサンプルを示したいと思います。

サンプルコード

以下の通りです。Ubuntu 16.04 + Python 3.6で動作を確認しています。

# -*- coding: utf-8 -*-

import argparse

import chainer
from chainercv.datasets import voc_detection_label_names
from chainercv.links import FasterRCNNVGG16
import numpy as np
from PIL import Image, ImageDraw, ImageFont


def convert_pilimg_for_chainercv(pilimg):
    """ pilimg(RGBのカラー画像とする)を、ChainerCVが扱える形式に変換 """ 
    img = np.asarray(pilimg, dtype=np.float32)
    # transpose (H, W, C) -> (C, H, W)
    return img.transpose((2, 0, 1))

def overlay(pilimg, bbox, label, score, label_names=voc_detection_label_names):
    """ pilimgに物体検出結果を重畳。vis_bbox.py を参考に実装 """

    draw = ImageDraw.Draw(pilimg)
    fnt = ImageFont.truetype('Pillow/Tests/fonts/FreeMono.ttf', 20)

    for i, bb in enumerate(bbox):
        y0, x0, y1, x1 = bb
        draw.rectangle([x0, y0, x1, y1], fill=None, outline='red')

        caption = list()

        if label is not None and label_names is not None:
            lb = label[i]
            if not (0 <= lb < len(label_names)):
                raise ValueError('No corresponding name is given')
            caption.append(label_names[lb])

        if score is not None:
            sc = score[i]
            caption.append('{:.2f}'.format(sc))

        if len(caption) > 0:
            message = ': '.join(caption)
            # テキストを表示するための矩形サイズを取得
            text_width, text_height = fnt.getsize(message)
            # テキストの背後を白く塗る
            draw.rectangle([x0, y0, x0 + text_width, y0 + text_height],
                           fill=(255, 255, 255, 128))
            # テキストを重畳
            draw.text((x0, y0), message, font=fnt, fill='black')


def main():
    parser = argparse.ArgumentParser()
    parser.add_argument('--gpu', type=int, default=-1)
    parser.add_argument('--pretrained_model', default='voc07')
    parser.add_argument('image')
    args = parser.parse_args()

    model = FasterRCNNVGG16(
        n_fg_class=len(voc_detection_label_names),
        pretrained_model=args.pretrained_model)

    if args.gpu >= 0:
        chainer.cuda.get_device_from_id(args.gpu).use()
        model.to_gpu()

    # PILを使って画像を読み込み
    pilimg = Image.open(args.image).convert('RGB')
    # ChainerCVが扱える形式に変換
    img = convert_pilimg_for_chainercv(pilimg)
    # 物体を検出
    bboxes, labels, scores = model.predict([img])
    bbox, label, score = bboxes[0], labels[0], scores[0]
    # 検出結果を重畳して表示
    overlay(pilimg, bbox, label, score, label_names=voc_detection_label_names)
    pilimg.show()
    # 結果を保存
    pilimg.save('result.jpg')

if __name__ == '__main__':
    main()

処理結果が表示された後、result.jpgという名前で保存されます。 自前で重畳処理をした結果を以下に示します。

f:id:minus9d:20170919223928j:plain

argparseで引数の個数を指定する

Pythonの標準ライブラリargparseで、nargsを使うと、オプションがとる引数の個数を指定できます。例えば、

import argparse
parser = argparse.ArgumentParser()
parser.add_argument("--arg1", nargs=3)
args = parser.parse_args()

if args.arg1:
    print(args.arg1)

とすると、オプションarg1はちょうど3個の引数を要求することを意味します。オプションの使用時には、

$ python prog1.py --arg1 a b c

と書けます。このとき、args.arg1には['a', 'b', 'c']が入ります。

同様に、

  • nargs='?':0個または1個の引数を要求
  • nargs='*':0個以上の引数を要求
  • nargs='+':1個以上の引数を要求

という意味になります。

Visual C++にて、CPUにAVX命令があるかどうかを実行中に知る方法

表題のことは、__cpuid, __cpuidexにあるサンプルコードで実現できます。Visual Studio 2017で確認しました。

自分の初代Core i7では、下記のようにAVXに対応していないことがわかります。

GenuineIntel
Intel(R) Core(TM) i7 CPU         870  @ 2.93GHz
3DNOW not supported
3DNOWEXT not supported
ABM not supported
ADX not supported
AES not supported
AVX not supported
AVX2 not supported
AVX512CD not supported
AVX512ER not supported
AVX512F not supported
AVX512PF not supported
BMI1 not supported
BMI2 not supported
CLFSH supported
CMPXCHG16B supported
CX8 supported
ERMS not supported
F16C not supported
FMA not supported
FSGSBASE not supported
FXSR supported
HLE not supported
INVPCID not supported
LAHF supported
LZCNT not supported
MMX supported
MMXEXT not supported
MONITOR supported
MOVBE not supported
MSR supported
OSXSAVE not supported
PCLMULQDQ not supported
POPCNT supported
PREFETCHWT1 not supported
RDRAND not supported
RDSEED not supported
RDTSCP supported
RTM not supported
SEP supported
SHA not supported
SSE supported
SSE2 supported
SSE3 supported
SSE4.1 supported
SSE4.2 supported
SSE4a not supported
SSSE3 supported
SYSCALL not supported
TBM not supported
XOP not supported
XSAVE not supported

g++によるhello world再訪

g++でhello.cppから実行ファイルを生成するときに何が起こっているかを調べてまとめました。全体的に gcc Compilation Process and Steps of C Program in Linux を参考にしています。元記事はCファイルを対象にしていますが、本記事ではC++ファイルを対象としています。

ソースコード

以下のコード hello.cpp をステップバイステップでビルドしていきます。このコードはC++11相当のコードです。

#include <iostream>
#include <vector>
#define MESSAGE "hello  "

int main(void)
{
    std::vector<int> vec{1,2,3,4,5};
    for(auto e: vec) {
        std::cout << MESSAGE << __FILE__ << " " << e << std::endl;
    }
    
    return 0;
}

1. プリプロセッシング

プリプロセッシングの結果を見る

まず最初に、プリプロセッシングと呼ばれる前処理が行われます。具体的には、

  • #includeでインクルードしたヘッダファイルの展開
  • #defineで定義した文字列の置換処理
  • __FILE____LINE__などの記号定数の置換処理

が行われます。(参考:マクロ展開の例

$ cpp -x c++ -std=c++11 hello.cpp > hello.i

または

$ g++ -E -std=c++11 hello.cpp > hello.i

で、プロプロセッシング後のファイルをhello.iという名前で保存できます。

hello.iの抜粋を以下に示します。

# 1 "hello.cpp"
# 1 "<built-in>"
# 1 "<command-line>"
# 1 "/usr/include/stdc-predef.h" 1 3 4
# 1 "<command-line>" 2
# 1 "hello.cpp"
# 1 "/usr/include/c++/5/iostream" 1 3
# 36 "/usr/include/c++/5/iostream" 3
...(中略)...
# 5 "hello.cpp"
int main(void)
{
    std::vector<int> vec{1,2,3,4,5};
    for(auto e: vec) {
        std::cout << "hello  " << "hello.cpp" << " " << e << std::endl;
    }

    return 0;
}

ヘッダファイルが検索されるディレクトリの場所を調べる

ヘッダファイルが捜索されるディレクトリの場所は、Cの場合は

$ gcc -xc -E -v -

C++の場合は

$ gcc -xc++ -E -v -

で調べることができます(参考:c++ - What are the GCC default include directories? - Stack Overflow)。私の場合は以下のように表示されました。

()
#include "..." search starts here:
#include <...> search starts here:
 /usr/include/c++/5
 /usr/include/x86_64-linux-gnu/c++/5
 /usr/include/c++/5/backward
 /usr/lib/gcc/x86_64-linux-gnu/5/include
 /usr/local/include
 /usr/lib/gcc/x86_64-linux-gnu/5/include-fixed
 /usr/include/x86_64-linux-gnu
 /usr/include
End of search list.

includeされるヘッダファイルのフルパスを調べる

ヘッダファイルは芋づる式にincludeされていくわけですが、具体的にどのパスにあるどのヘッダファイルがincludeされたかは、

$ g++ -std=c++11 -H hello.cpp

で調べることができます(参考:c++ - How to tell where a header file is included from? - Stack Overflow)。私の環境だと以下のようにツリーが表示されました。

$ g++ -H hello.cpp       
. /usr/include/c++/5/iostream
.. /usr/include/x86_64-linux-gnu/c++/5/bits/c++config.h
... /usr/include/x86_64-linux-gnu/c++/5/bits/os_defines.h
.... /usr/include/features.h
..... /usr/include/x86_64-linux-gnu/sys/cdefs.h
...... /usr/include/x86_64-linux-gnu/bits/wordsize.h
..... /usr/include/x86_64-linux-gnu/gnu/stubs.h
...... /usr/include/x86_64-linux-gnu/gnu/stubs-64.h
...(略)...

2. アセンブリコードへの変換

次に、コンパイラは、hello.iアセンブリコードに変換します。

$ g++ -std=c++11 -S hello.i

とすると、アセンブリコードhello.sが生成されます。

        .file   "hello.cpp"
        .section        .rodata
        .type   _ZStL19piecewise_construct, @object
        .size   _ZStL19piecewise_construct, 1
_ZStL19piecewise_construct:
        .zero   1
        .local  _ZStL8__ioinit
        .comm   _ZStL8__ioinit,1,1
...(略)...

3. オブジェクトファイルへの変換

次に、asコマンドを使って、アセンブリコードhello.sからマシン語に変換し、オブジェクトファイルhello.oを得ます。

$ as hello.s -o hello.o

hello.oの中身は

$ objdump -d hello.o

で調べることができます。以下は実行例です。

0000000000000000 <main>:
   0:   55                      push   %rbp
   1:   48 89 e5                mov    %rsp,%rbp
   4:   41 55                   push   %r13
   6:   41 54                   push   %r12
   8:   53                      push   %rbx
   9:   48 83 ec 58             sub    $0x58,%rsp
   d:   64 48 8b 04 25 28 00    mov    %fs:0x28,%rax
...(略)...

4. リンク

実行ファイルを生成する

最後に、さっき生成したオブジェクトファイルhello.oおよび、他に必要なオブジェクトファイルを集めてリンクし、実行ファイルを生成します。

$ g++ hello.o -o hello

とすると、実行ファイルhelloが生成されます。

ライブラリが検索されるディレクトリの場所、リンクされるライブラリのフルパスを調べる

$ g++ -v hello.o -o hello

とすると、以下のように詳細情報が表示されます。

LIBRARY_PATH=/usr/lib/gcc/x86_64-linux-gnu/5/:/usr/lib/gcc/x86_64-linux-gnu/5/../../../x86_64-linux-gnu/:/usr/lib/gcc/x86_64-linux-gnu/5/../../../../lib/:/lib/x86_64-linux-gnu/:/lib/../lib/:/usr/lib/x86_64-linux-gnu/:/usr/lib/../lib/:/usr/lib/gcc/x86_64-linux-gnu/5/../../../:/lib/:/usr/lib/

は、ライブラリが検索されるディレクトリの場所を表していると思います。

また、

COLLECT_GCC_OPTIONS='-v' '-o' 'hello' '-shared-libgcc' '-mtune=generic' '-march=x86-64'
 /usr/lib/gcc/x86_64-linux-gnu/5/collect2 -plugin /usr/lib/gcc/x86_64-linux-gnu/5/liblto_plugin.so -plugin-opt=/usr/lib/gcc/x86_64-linux-gnu/5/lto-wrapper -plugin-opt=-fresolution=/tmp/ccvdOxv1.res -plugin-opt=-pass-through=-lgcc_s -plugin-opt=-pass-through=-lgcc -plugin-opt=-pass-through=-lc -plugin-opt=-pass-through=-lgcc_s -plugin-opt=-pass-through=-lgcc --sysroot=/ --build-id --eh-frame-hdr -m elf_x86_64 --hash-style=gnu --as-needed -dynamic-linker /lib64/ld-linux-x86-64.so.2 -z relro -o hello /usr/lib/gcc/x86_64-linux-gnu/5/../../../x86_64-linux-gnu/crt1.o /usr/lib/gcc/x86_64-linux-gnu/5/../../../x86_64-linux-gnu/crti.o /usr/lib/gcc/x86_64-linux-gnu/5/crtbegin.o -L/usr/lib/gcc/x86_64-linux-gnu/5 -L/usr/lib/gcc/x86_64-linux-gnu/5/../../../x86_64-linux-gnu -L/usr/lib/gcc/x86_64-linux-gnu/5/../../../../lib -L/lib/x86_64-linux-gnu -L/lib/../lib -L/usr/lib/x86_64-linux-gnu -L/usr/lib/../lib -L/usr/lib/gcc/x86_64-linux-gnu/5/../../.. hello.o -lstdc++ -lm -lgcc_s -lgcc -lc -lgcc_s -lgcc /usr/lib/gcc/x86_64-linux-gnu/5/crtend.o /usr/lib/gcc/x86_64-linux-gnu/5/../../../x86_64-linux-gnu/crtn.o

は、リンク時に使われたコマンドの詳細を表していると思います。collect2とはgcc/g++が内部で呼び出すリンクのためのコマンドのようです。ldとの違いはよくわかりません…。

その他の情報

$ g++ -save-temps -std=c++11 hello.cpp

とすると、上記でステップバイステップで生成した中間ファイル hello.ii, hello.s, hello.o が一気に生成されます。