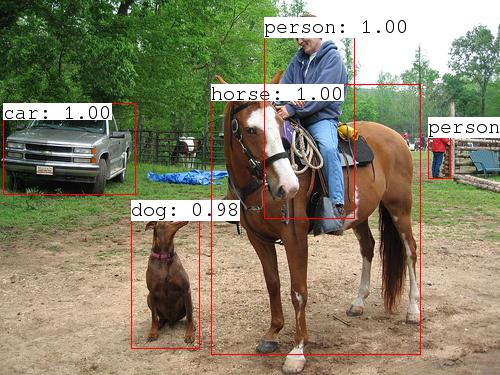
今年の8月、PFNからGitHub - chainer/chainercv: ChainerCV: a Library for Computer Vision in Deep Learningがリリースされました。今のところ2つの物体検出手法(Faster R-CNN, SSD)と1つの画像セグメンテーション手法(SemSeg)が実装されています。examplesフォルダにあるサンプルファイルを実行するだけでお手軽に物体検出を試せるようになっていて、敷居が下がっています。
しかしながら、公式サンプルでは、入力画像を読み込むのに`chainercv.utils.read_image()を使う方法しか示されていないようです。そこで、この記事では、Pillowで読み込んだ画像に対してFaster R-CNNを実行し、自前で検出結果を画像に重畳するサンプルを示したいと思います。
サンプルコード
以下の通りです。Ubuntu 16.04 + Python 3.6で動作を確認しています。
# -*- coding: utf-8 -*-

import argparse

import chainer
from chainercv.datasets import voc_detection_label_names
from chainercv.links import FasterRCNNVGG16
import numpy as np
from PIL import Image, ImageDraw, ImageFont


def convert_pilimg_for_chainercv(pilimg):
    """ pilimg(RGBのカラー画像とする)を、ChainerCVが扱える形式に変換 """
    img = np.asarray(pilimg, dtype=np.float32)
    # transpose (H, W, C) -> (C, H, W)
    return img.transpose((2, 0, 1))

def overlay(pilimg, bbox, label, score, label_names=voc_detection_label_names):
    """ pilimgに物体検出結果を重畳。vis_bbox.py を参考に実装 """

    draw = ImageDraw.Draw(pilimg)
    fnt = ImageFont.truetype('Pillow/Tests/fonts/FreeMono.ttf', 20)

    for i, bb in enumerate(bbox):
        y0, x0, y1, x1 = bb
        draw.rectangle([x0, y0, x1, y1], fill=None, outline='red')

        caption = list()

        if label is not None and label_names is not None:
            lb = label[i]
            if not (0 <= lb < len(label_names)):
                raise ValueError('No corresponding name is given')
            caption.append(label_names[lb])

        if score is not None:
            sc = score[i]
            caption.append('{:.2f}'.format(sc))

        if len(caption) > 0:
            message = ': '.join(caption)
            # テキストを表示するための矩形サイズを取得
            text_width, text_height = fnt.getsize(message)
            # テキストの背後を白く塗る
            draw.rectangle([x0, y0, x0 + text_width, y0 + text_height],
                           fill=(255, 255, 255, 128))
            # テキストを重畳
            draw.text((x0, y0), message, font=fnt, fill='black')


def main():
    parser = argparse.ArgumentParser()
    parser.add_argument('--gpu', type=int, default=-1)
    parser.add_argument('--pretrained_model', default='voc07')
    parser.add_argument('image')
    args = parser.parse_args()

    model = FasterRCNNVGG16(
        n_fg_class=len(voc_detection_label_names),
        pretrained_model=args.pretrained_model)

    if args.gpu >= 0:
        chainer.cuda.get_device_from_id(args.gpu).use()
        model.to_gpu()

    # PILを使って画像を読み込み
    pilimg = Image.open(args.image).convert('RGB')
    # ChainerCVが扱える形式に変換
    img = convert_pilimg_for_chainercv(pilimg)
    # 物体を検出
    bboxes, labels, scores = model.predict([img])
    bbox, label, score = bboxes[0], labels[0], scores[0]
    # 検出結果を重畳して表示
    overlay(pilimg, bbox, label, score, label_names=voc_detection_label_names)
    pilimg.show()
    # 結果を保存
    pilimg.save('result.jpg')

if __name__ == '__main__':
    main()
処理結果が表示された後、result.jpgという名前で保存されます。
自前で重畳処理をした結果を以下に示します。
